LiveKit AI Agent Under the Hood
Unraveling the Agent Session
This is a follow-up to the last story I wrote on basic AI Agent creation, in which I explained how to create a basic agent using LiveKit’s AgentSession, which is quite straightforward.
To create an agent that truly makes a difference in the market, we need to understand what is happening under the hood. In this article, we will examine how the Agent Session and the overall SFU (Selective Forwarding Unit) function to facilitate the creation of AI Agents.
Different frameworks provide the agent creation, for example, oopik, pipecat, etc., but the biggest reason behind choosing LiveKit because of its scalable architecture, which I will discuss later.
Key Points
Before diving deep into LiveKit’s architecture of how AI Agents work, we first need to understand the basics of WebRTC used in our agent creation.
- SFU(Selective Forwarding Unit):- So basically WebRTC was created by Google to enable real-time voice and video communication directly within web browsers, without the need for plugins or additional software, but as as the number of participants started growing, peer-to-peer communication became overwhelming, SFU initially filled this gap by allowing a scalable, low-latency, and flexible real-time communication while keeping bandwidth and CPU usage manageable. To read more about the comparison and all, here is the perfect article for this. I will also write an article about it, so stay tuned.
- Room: There are sessions for different users, where an agent is dispatched to each of them, so that everyone is subscribed to. Here, every participant publishes their tracks and subscribes to different users' tracks through SFU.
- Participant: The users I talked to earlier are called participants. They have tracks such as a microphone for audio publishing, or a screen for video/screen sharing to the room, so that everyone can communicate in the room.
What Is Livekit Agents?
I have read one paragraph on the livekit page, which taught me enough about things we need to create AI Agents, which goes like this: Unlike traditional HTTP servers, agents operate as stateful, long-running processes. They connect to the LiveKit network via WebRTC, enabling low-latency, real-time media and data exchange with frontend applications.
Livekit agents are the framework used to create programmable, multimodal, multinodal AI Agents efficiently, using the power of real-time communication in WebRTC.
Architectural Flow of Livekit Agent
if (name == __main__):
  cli.run_app(WorkerOptions(
    entrypoint_fnc=entrypoint,
    prewarm_fnc=prewarm
  ))
When our agent code(main.py) runs as a LiveKit agent, it registers itself with the LiveKit server (an SFU) and becomes a worker — a persistent background process that waits for incoming user sessions. Once a LiveKit room is created, an available worker accepts the job, launching your agent logic as a separate process to handle the session in an isolated context.
Within that session, your entrypoint and the function executes as soon as the worker is dispatched. From there, the agent connects to the LiveKit room using WebRTC, subscribes to media tracks (voice, video, data), and runs whatever custom logic — including STT, LLM, TTS pipelines, or other plugins — you’ve defined.
Inside entrypoint
async def entrypoint(ctx: JobContext):
    await ctx.connect()

    session = AgentSession(
        stt=deepgram.STT(),
        llm=openai.LLM(),
        tts=cartesia.TTS(),
        vad=silero.VAD.load(),
        turn_detection=turn_detector.MultilingualModel(),
    )
As we studied before, the agent gets registered to the livekit server, and after that, it becomes a worker and immediately runs the entrypoint function. So let's dissect the entrypoint function.
Inside the entrypoint function, we see that their session creation using AgentSession is the most important function for agent workflow creation.
What is AgentSession?
Note: Agent Session is not available in their V0 version, which means you are currently not able to create an agent using the agentsession pipeline in Node.js, but possible in Python.
The AgentSession serves as the core orchestrator for voice AI interactions. It manages:
- Collecting user input
- Driving the STT → LLM → TTS pipeline,
- Handling turn detection, VAD(Voice activity detection), speech flows, and media tracks, then sending responses back to users.
STT-LLM-TTS Pipeline
There is another method to create real-time agents, like S2S (Speech to Speech), which may be good for latency but won't be able to create Intelligent Agents, so we use this pipeline architecture to orchestrate our tasks efficiently and interpretably needed.
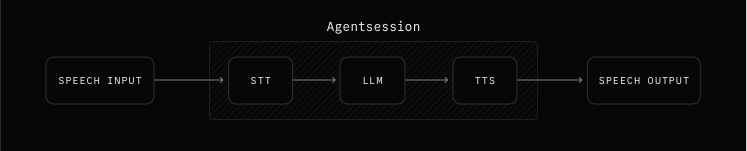
So at the core of AgentSession, we see that the STT, LLM, TTS pipeline helps the agent to interpret the tasks of agents efficiently and is used to create any agent possible, or you can think of any customizable part. A small component also gets used here for efficient voice conversion, called VAD.
VAD(Voice Activity Detection): So, at the start, when you start speaking with agents, then your voice, which is in WAV or any other format, is converted into the OPUS format in the case of Silero(It is an open source VAD around ~60–70 MB). So this VAD thing is used to detect if the user is speaking or not and creates the timestamps where the user is speaking or not, which makes the STT efficiently transcribe.
STT(Speech-to-Text): After VAD, the timestamped voice gets transferred to the STT, which converts the voice to text, which is then used for LLM intelligence.
LLM(Large Language Model): This is, as everybody knows, used to convert text to text, which we are using as a brain; this is the place where we can make awesome custom architecture using an open source framework like Langchain or any other similar framework to orchestrate the informative and intelligent architecture for our business use case.
TTS(Text-to-Speech): The text we got from LLM is going to be used to convert speech. This is the place where we can interpret the agent to say or write a message, like let me explain with an example.
Consider a situation where we need to know a password or a magic word, but as this is a confidential situation in which if agent speaks the password or any personal info then its not so secure so there might be solution, in which the text may came from LLM instead of transferring to TTS, we send directly to any room or any other channel which accept like textual format, so this may be beneficial and agent is intelligent what to do.
As I told you before, the TTS is the place to modify this pipeline according to our use case. This can be done using nodes and the pipeline architecture of LiveKit (tts_node).
Turn Detection: This is the most important thing during the whole conversation, and was a barrier in the live or real-time conversation.
The problem was that when a user speaks,, they are human,s they taka e pause or think something like(let's say, ummm, etc.), so this pipeline is made so that if the user says something, the whole architecture will run and all the transcription and TTS happen instantly, which doesn’t feel real, to make it intelligent when to say and when to stop, we must need something smart enough to capture if user is saying or not and we need to generate the speech or not.
To conquer this problem, we need something known as semantic turn detection, but there are many which are not so efficient, there comes LiveKit’s turn detection which is also a State-of-the-Art model which specifically very small in size and open source turn detection inference provider which runs as separate process in the machine and detects any pauses or interruptions and accordingly makes the agent viable through this that when to and when not to generate speech.
Running AgentSession
await session.start(
    room=ctx.room,
    agent=Agent(instructions="You are a friendly voice AI assistant."),
    room_input_options=RoomInputOptions(noise_cancellation=noise_cancellation.BVC()),
)
To make the agentSession run, we use the start method, in which we want to add the room object with the agent class and room input options. Let me explain them one by one.
- Room — The ctx here means the JobContext, which we get at the start of the entrypoint as a parameter, which is used to dispatch the agent to the room.
- Agent Class — This is used to assign an agent to the room with the necessary configuration. The snippet I have written under is just a normal agent with a small instruction that tells it is a helpful voice assistant. You can customize workflows, configuration, etc., inside it.
class Assistant(Agent):
    def __init__(self) -> None:
        super().__init__(instructions="You are a helpful voice AI assistant.")
- Room Options — This is the place where you can define various room configurations, like noise cancellations, audio, video, and text transcription enablement, or not.
Apart from this, we can also add ambient background noise to make the conversation feel more natural.
Why is this architecture scalable?
The biggest reason is that this architecture is highly scalable because of LiveKit’s SFU (Selective Forwarding Unit) model combined with worker-based agents. Let me explain this.
- SFU Efficiency: Instead of every participant sharing media to every other participant in the room, SFU acts as a proxy and routes only to the necessary participants by enabling the pub/sub and topic methods like Kafka, which dramatically decreases the latency and makes the efficient use of available bandwidth and CPU, which are the bread and butter of any production server.
- Worker Isolation: Each agent works as an isolated worker process, which has 2 benefits: we can horizontally scale the number of concurrent connections at a time, handling thousands of concurrent sessions without bottlenecking a single server, depending on the server capabilities, and secondly, it provides security that o two sessions can interfere in one another’s process which leads to that the media and data sharing between user and agent will always remain isolated.
- Modular Pipelines: Because the STT → LLM → TTS pipeline and plugins (like VAD, turn detection) are modular, we can distribute them across different nodes or swap providers without breaking the architecture. This gives flexibility to scale compute-heavy tasks independently.
Conclusion
LiveKit Agents take the complexity of real-time AI assistant development and wrap it into a structured, reliable framework. By leveraging AgentSession, developers can orchestrate the full STT → LLM → TTS pipeline, integrate VAD and turn detection for natural conversation flow, and scale across multiple rooms and participants with the help of LiveKit’s SFU architecture.
That’s all you need to bring your next AI Agent to life. In the meantime, you can check out AIvengers, which is still under development and wants a server to run, so until then, Peace Out!.